Hello again ... Sorry we have taken so long to update our blog site. We have been in a mad dash to finish up our work before winter sets in here in Michigan.
Well onto our next project from this summer ( we have been reviewing most of the projects we have done this year 2010.)
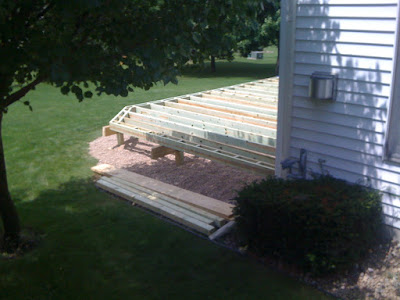
This project is a re-cover project the homeowner was working with a budget in mind and replacing the complete deck was not in their budget range. The under carriage or sub-frame ( Joists, Beams, Main support posts, and Footings ) were in good shape and they were only about 10-15 years old so we could save the homeowner some money by re-using the under carriage. (re-cover) Where as a (replacement) you have the added cost of the removal of the complete deck, new footings, new main support posts, beams, and joist.
Some things to consider on deck re-covers
1) Deck Joist spacing:
On this project the joist were 2' on center which is the maximum joist span allowed for most all deck boards, the old decking was 2x4 and we replaced the decking with 2x6 Cedar. All deck boards have a span rating such as 12" on center, 16" on center, and 24" on center are the most common deck framing.
2) Deck Footings:
Footings are the main concern in re-cover projects, they are the first thing I look at when I am on a estimate. I believe if there is any frost heave of the footings/posts, rot of the main support posts, or over spanning of the beams I always recommend replacing the deck.
3) The decking products:
Most common recovers are from a old wood deck to some type of Composite or PVC decking. So how the old deck was framed and built will affect your choice or you will need to modify your exist framing to compensate for the new decking or railings manufactures specifications. Deck board spans, framing code compliance of the old deck, and the angle you intend to run your decking will need to be consider. Check the manufactures specifications and the local code authority.
4) Budget:
How does a replacement deck verses a recover deck compare, how much will you save? I have never seen a new house built on a old foundation, but I have seen some really nice additions work out built on the original foundation. I usually quote both ways if the deck inspection is ok, and we let the home owner's budget dictate the outcome.
Hope that helps you make the best decision when it comes time to re-cover or replace your deck.
Now back to the project in Clinton Twp. MI
Now back to the project in Clinton Twp. MI
In the picture below we have already removed the old deck boards, we doubled each joist with a new joist just as a pre-caution, we have also removed all the old railings and installed new Cedar railing post that are recessed and blocked into the frame.
Here we have just installed the two tiered 1x6 Cedar fascia boards which cover all the treated frame work
The homeowner wanted to pick up the beige and white brick color of the house with the Cedar and white metal baluster combo.
The railing posts are 4x4 Cedar cut at 42" tall, the top and bottom rails are Cedar 2x4 cut to size.
The baluster connectors are spaced at 4.5" and attached with a stainless screw. The white 3/4 round Deckorators aluminum balusters slide into the connectors.
You also can see the decorative post skirt and the picture frame border.
 Finished railings with the Cedar decorative post caps. Under the center of the bottom rail is a small baluster squash block to protect from sagging of the bottom railing.
 The last note on this project is a request by the homeowner to build a fenced in area off the deck to enclose their small dog. They wanted the fence to match the deck railing which was kind of unique.
We set all the fence posts 42" below grade, and cement them in, and we ran long threaded rods thru the center baluster of each fence section, the balusters are hollow inside so there was room to run a 3/8s threaded thru bolt with a nut washer on each end.
Thank you for reading our blog.


