I am hoping to go back to our weekly post.

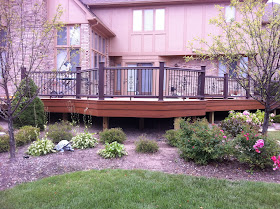
 Today we are going to look at a Timber Tech Evolutions cap composite deck we built last year. Here is the framing plan on the left along with a 3D design. We matched the old deck layout except where the old deck had a step down octagon. The homeowner wanted the new deck all on the same level so we did a two tone picture frame border and we wrapped the border around the octagon to add a design focal point to the octagon area on one level. The old deck was cedar and needed to be updated so the client wanted a synthetic deck with much lower maintenance then the cedar deck. We recommended Timber Tech Evolutions for a high grade cap composite that is durable, Evolutions has a 25 year fade and stain warranty which is outstanding.
 Here in the picture on the right we just finished up installing the Timber Tech Evolutions Teak decking and the two tone Teak/Walnut border and octagon inlay. The border/inlay really gives the deck some interest and the octagon inlay gives a distinction to this area which was a step down in the old deck. The decking is installed with Timber Tech Concealoc hidden fastening clips, and the borders are screwed down with color matching stainless steel Headcotes.
 Once we finish the decking/borders we move onto the railing post which we cut out holes to set the treated 4x4 posts thru and then we attach with 3) 8" Thrulok bolts. You can see this in the small picture above where two members of the crew are laying out and cutting in posts. Once the 4x4 rail support posts are install we move to installing the triple stack fascia. Here in the picture on the right the 4x4 post and the Radiance rail sleeves have been installed along with the triple stack fascia. The triple stack fascia is our standard fascia detail that we use to hide all the frame work it start just below the beam level and stacks out from there.
This hides all the frame work except the posts. The other main detail is that the border cover over the fascia so no water will enter the frame/fascia gap which is a hugely important detail that most all other builders leave out.
 One last detail we do is to trim out the flashing on the deck. The deck flashing is cut into the brick which had to be above the decking level to hit a mortar joint. We covered the flashing with a rip off a XLM Walnut Groove deck board again to hide the Z flashing that was cut into the brick veneer above the decking level to protect the ledger from water intrusion.
The last step was installing the Trex low voltage lighting on the rail
post
All finished up !
Thanks for reading !


No comments:
Post a Comment