Saturday, July 18, 2015

How to build a low to the ground deck part 2

Hello again...

Part two: How to build a low to the ground deck.

 So we are working on a low to the ground level deck project in Macomb Township MI. Where the clients had a failed stamped concrete patio that we are building a deck over.

 Let finish up the framing details. Here is the framing plan see below. There was a small modification to the deck plan during construction where we cut the corners on the deck. The homeowner wanted the corners cut but the existed concrete patio only allowed 1'6" cut corner. Because we had the room enough without having to remove anymore concrete.


Another point with framing of this project is the location of the beam closest to the house. On a low deck like this it is a challenge if the house has brick we cannot attached to the house. Normally in a free standing deck design you would have the inside beam/posts a couple of feet of the house, but here if we do it that close to house the posts would be in the 5' basement back-fill zone.  Where the post hole footing have to go down to virgin soil and about as deep as the basement footing height. So on this deck the four posts would be 8' -  9' deep.

So we had a an engineer design a typical ledger connection through a brick veneer on short spans of 6' or less to avoid this type of scenario as in this project. The one post by the fireplace we had to do extra deep because we cannot attached a ledger where there is a fireplace.

Basically we have to drill 1 1/2" holes through the brick so the 3/4" lag bolts don't bear on the brick and crack the brick from the deck load. Than we install 3/4" x 8" galvanized lag bolts into the house rim joist to support the short spanned ledger.


Here are some final pictures of this deck project.


Here in the picture above you see why we had the 12" on center joist spacing, because the Timber Tech Legacy decking is running on a 45 degree angle the framing has to be 12" on center. Also you can see why we had all the blocking installed around the perimeter and up the middle of the deck. For the picture frame border and center seam board.

We usually always picture frame our decks so the fascia cladding is protected. If you looking at the pictures from part one you can see why it costs more or is a big up grade from the way most guys build a deck without the picture frame border over the deck rim and fascia cladding.


Above we are working on building a built in bench, which is kind of built like a mini deck on rail posts. 


Thanks for reading our blog. I hope we inspired you with a new outdoor living project !

Sunday, July 12, 2015

How to build a low to the ground deck.

Hello again ... we are back !


On this deck project in Macomb Township Michigan our client had a older stamped concrete patio that cracked and shifted, they wanted to switch to a deck. They have a pretty narrow lot and there was not a lot of room to easily get equipment back to remove all of the bad stamped concrete. So we left the patio and just cut out 2'x 2' squares out the patio to install the four post hole footings that are about 5'6" off the house. The other four post hole footings are outside of the old patio so there was no extra work needed to install them.

A big factor in low to the ground decks is cross ventilation, so the underside of the deck can get some air movement to dry out any moisture on the underside of the decking or framing.


Another factor is having room for the framing so that it avoids ground contact.


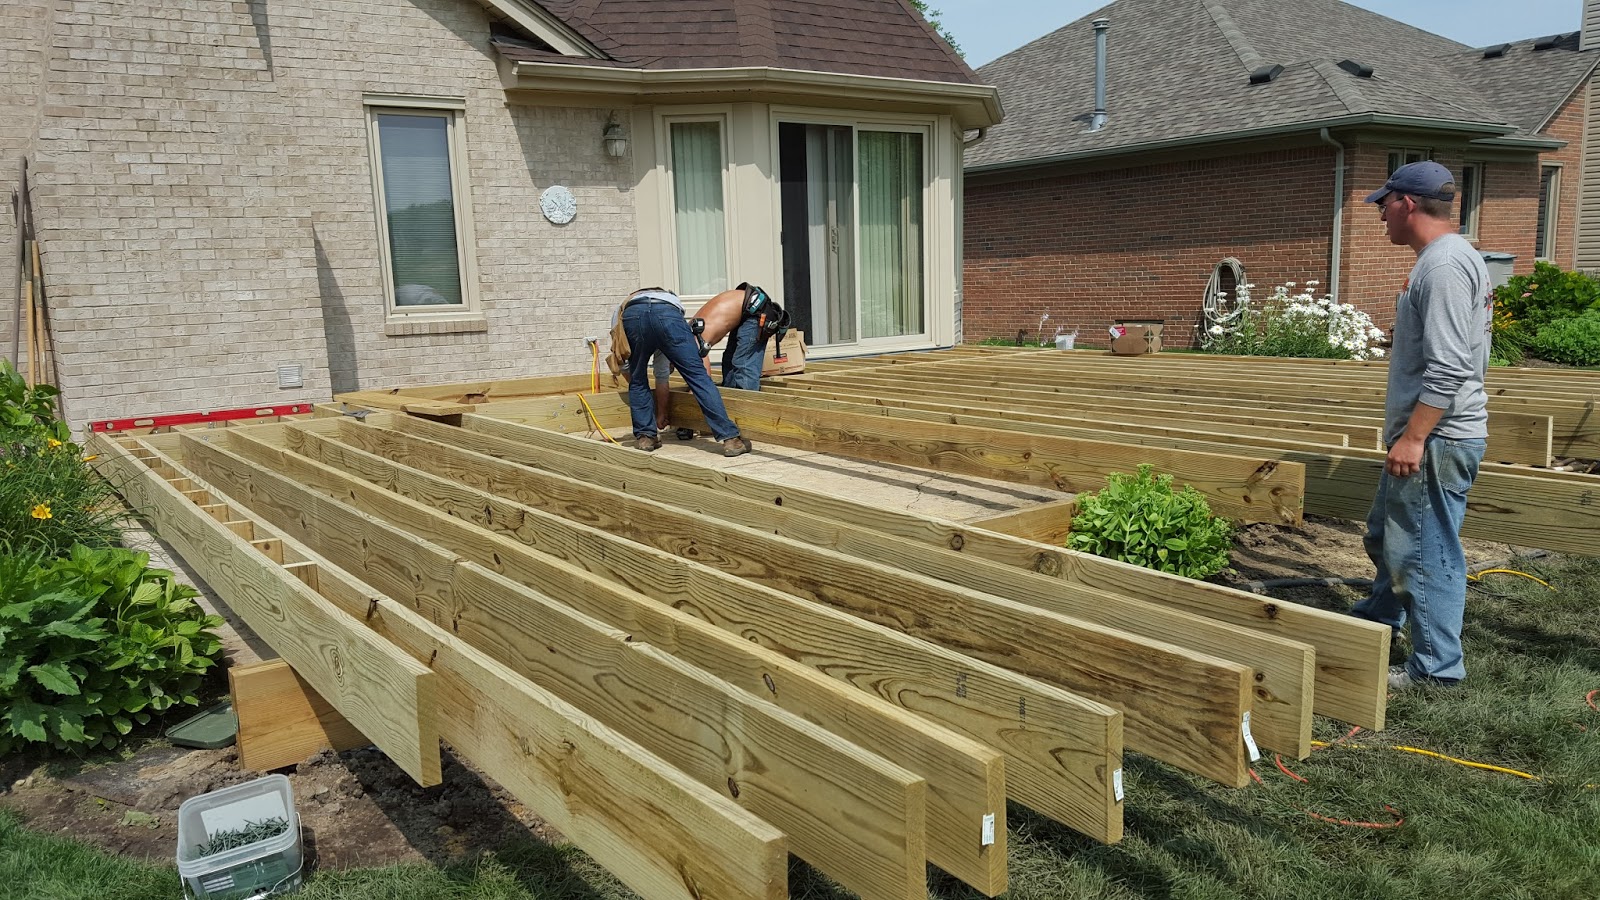
 Let's get to some pictures to help explain this project. Here in the first couple of pictures we pick up in progress framing this deck project.


You can see the carpenters installing the deck joist. Notice the existing old stamped concrete patio underneath the deck. We have already cut out the concrete and installed the post hole footings, the 4x6 treated posts, and the double 2x10 beams. Notice there is not much clearance below the joists, certainly not enough to have drop beam under the joist how most decks are built. If you look at the outside beam it is under the joists because it is outside of the patio.

Middle rim joist deck beam


Standard (dropped) deck beam
So the only choice here for the middle beam is to have it at the joist height. It is done the exact same way as a drop beam only the joist are all supported by joist hangers. This middle beam works only because we have a ledger attachment everywhere except where the fireplace chimney is located. We have engineered plans that allows us to attach to a cantilevered bay and through a brick veneer for spans under 6'
Here above is a picture of the proper way to flash the cantilevered bay. The siding and trim has to be removed and the deck ledger must be attached to the bay not as much for loading but for lateral support and so you flash the ledger. We use a pre-formed plastic ledger flashing that runs about 3" behind the siding and over the ledger. I cannot tell of how many times I have seen deck ledger installed over house siding where water debris will just sit and promote decay and rot. It is not that much more work to do it right even if you not attaching the ledger to the house as the saying goes water wins that is why there is a grand canyon.

 Another point on this job is we have a fireplace chimney in our deck area that the code requires us to leave a 1" gap between the deck framing and the masonry fireplace chimney. Here we beamed around the fireplace because there is not any way to attached to a fireplace on this side is supported by the dual joist, and the other side there is a 4x6 support post. 


I will have another update on this project in a few days.


Thanks for reading ... I hope we can help inspire you with your outdoor living construction projects !

Sunday, November 16, 2014

Building composite decks - Rochester Hills MI composite deck project.

Hello everyone ... After a busy year of deck construction in Michigan we have finally found some time to update our blog. Today we will look at a project we did back in May. It is a full backyard deck and patio design.

 On this new construction project we had an open slate to design, the homeowner wanted a deck off the upper level door wall leading to a walkway / patio to service the lower level.

Design Top View


3D View


Here we pick up the project with the hardscaping already installed and we will focus on the deck portion of the project.                                                                                                                       The deck is 14x25 with a 3x15 center bay with double cut corners. The bay works to add some flair to a basic square deck, which works good to fit into our customers budget. 


The decking is Timber Tech Legacy Tigerwood  with a Legacy Mocha double picture frame border and center seam board. Here in the picture we have already installed the decking and we are working on installing the rail posts. 


  We always install the rail posts after the decking is completed. You can see how hard it would be to cut the double border in after the rail posts are installed. We plan the framing accordingly for the proper blocking to attach the 4x4s with the Fastenmaster Thrulok bolts.

 Here is a closer picture of the framing after the railings are installed. Notice the three Thrulok bolts through the rim joist at the corner of the bay that takes care of the rail post attachment. Then below that you have the 2x4 drop down blocking on the bay along with the triple 2x12 beam that also acts as blocking for the triple stack fascia.
 A few other points you can see: We have started the 1x cladding on the 6x6 support posts with the post dimensions of a 6x6 at  - 5"1/2 " x  5"1/2"  A 12" deck fascia ripped in half works for two sides and two 8" stair riser fascia for the other two sides that have a finished edge. The other point in the picture is the lateral load bracing we usually do which is a 5/4 board attached with three 16D nails to the underside of the floor joist running on a 45 degree angle to brace both ways against lateral loads.  


Here the railings are completed and we are working on the triple stack fascia. The railings are Timber Tech Evolution Builder rail with Deckorators Estate balusters all in black. The 2x4 blocking for the triple stack fascia is finished.  

Working on the first course of Timber Tech Legacy mocha fascia. Below in the next picture you can see the different stacks of the fascia cladding that is done already so we can finish the stair railings.


Here is a picture of the stairs that shows a closer shot of the fascia corner and the 6x6 post cladding when finished.


Final pictures below....